Vendor phone numbers:
First, I learned about the Bay Bottom Crawl, a speed trial held on Sugarloaf Key every year around October, the locals say it's the best event in South Florida. I decided I wanted to participate. Only real problem, they require rollbars on all open cars participating in the BBC. Well, I was planning on getting one eventually - the event was 3 weeks in the future, so it really shouldn't be a problem to get a bar in that period of time.
Second, I met another Miata owner who had had a rollbar installed locally. It was a custom job, and it looked really good. All the (visible) welds were good, the finish was nice, and the configuration looked both SCCA Solo I legal, and practical for a street car. I traded phone numbers with him and he said his friend who made the bar could make one for me, also. About a half a week later, I called him up and got the number of his friend who did the bar. I called the guy and he said "Sure, I can do another bar like that one. We've got some drawings. (He thought that it was a bolt-in job, no welding on the car.) I'm kinda swamped this week, but next week I should have time." So, I decided to wait until the Monday before the BBC to go up & meet the guy who is going to install my bar, bad idea.
SCCA goes on to say that in most cases, mild steel is preferred over alloy, and bolt attachments to the vehicle are preferred over welding; both of these preferences are due to concerns about local embrittlement and weld quality questions. Certainly, it's easier to inspect a bolt than a weld.
When we get there, he remembers having to weld the bar to the structure of the car, couldn't get it to bolt in like the drawings for some reason... He remembers it being "a real bitch" to get the thing in... I take him back to his shop, and run home as fast as I can to call the California pre-fab shops before they close.
 Tuesday morning I get the Hard Dog fax when I come in to
work, nice looking stuff, but a bit pricey. I call Brainstorm, they also have
a bar in stock ready to ship, and it sounds like their configuration will be both
easier to install, and possibly structurally superior to the Autopower bar.
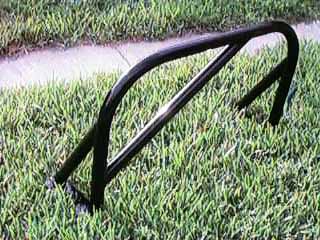
The Brainstorm bar has two 2"x12" plates that attach to both the front and back
legs. My impression of the Autopower bar (could be wrong) is that it has
separate plates for the front and back legs, with the front leg plates attaching
to the seat belt towers. While the seat belt towers may be a stronger attachment
point, I believe the larger plate should compensate. It certainly simplifies
installation. I order the Brainstorm bar, the one they have in stock doesn't
have the shoulder harness attachment bar between the back braces, so I'll be
adding a bar there later, when I get my racing seat and 5 point harness. Since
that model of bar has been discontinued, they gave me a $50 break on the price,
which just covered the 2nd day air shipping cost. Due to the height of the
bar (or lack thereof), I will have to get the racing seat in order to get my
head 2" below the top of the bar to meet the SCCA Solo I bar height requirements.
Hard Dog's hard bar is nearly 2" higher, but interferes with hardtops, pick
your comprimise - I kinda wanted a racing seat anyway.
Tuesday morning I get the Hard Dog fax when I come in to
work, nice looking stuff, but a bit pricey. I call Brainstorm, they also have
a bar in stock ready to ship, and it sounds like their configuration will be both
easier to install, and possibly structurally superior to the Autopower bar.
The Brainstorm bar has two 2"x12" plates that attach to both the front and back
legs. My impression of the Autopower bar (could be wrong) is that it has
separate plates for the front and back legs, with the front leg plates attaching
to the seat belt towers. While the seat belt towers may be a stronger attachment
point, I believe the larger plate should compensate. It certainly simplifies
installation. I order the Brainstorm bar, the one they have in stock doesn't
have the shoulder harness attachment bar between the back braces, so I'll be
adding a bar there later, when I get my racing seat and 5 point harness. Since
that model of bar has been discontinued, they gave me a $50 break on the price,
which just covered the 2nd day air shipping cost. Due to the height of the
bar (or lack thereof), I will have to get the racing seat in order to get my
head 2" below the top of the bar to meet the SCCA Solo I bar height requirements.
Hard Dog's hard bar is nearly 2" higher, but interferes with hardtops, pick
your comprimise - I kinda wanted a racing seat anyway.
I must admit, I was a bit prejudiced against Brainstorm, any company who
sells all those trunk lights, gas bibs and other stuff can't be serious,
can they? Pat said that it takes him about an hour to do a rollbar
installation - I have trouble believing that, but hopefully it's a better
place to start from than the Autopower bar that takes the makers all day
to put it in.
 Tuesday evening after working late ('til 8:30, big
presentation on Thurday) I come home and start the disassembly process. I've
had the package tray area partly exposed before while doing the stereo
installation, but I've never had the metal plate out before. As I've read
elsewhere, a claw hammer really helped to remove the carpet tacks. The rest
of the bolts were 10mm (lots of 'em), and a phillips screwdriver was needed
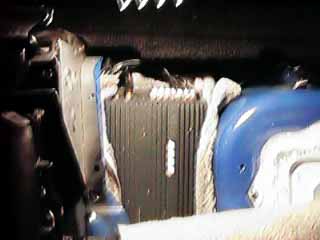
to get some trim off. This is the first time I've seen my stereo amplifier
from this angle, it really is a tight fit, it will definately have to
find a new home when the rollbar goes in.
Tuesday evening after working late ('til 8:30, big
presentation on Thurday) I come home and start the disassembly process. I've
had the package tray area partly exposed before while doing the stereo
installation, but I've never had the metal plate out before. As I've read
elsewhere, a claw hammer really helped to remove the carpet tacks. The rest
of the bolts were 10mm (lots of 'em), and a phillips screwdriver was needed
to get some trim off. This is the first time I've seen my stereo amplifier
from this angle, it really is a tight fit, it will definately have to
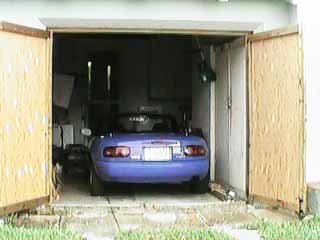
find a new home when the rollbar goes in.Wednesday evening I will be buying tools, a 12" long 3/8" drill bit (advised by Pat at Brainstorm), tin snips, return my bent Crapsman torque wrench to Sears for a replacement - everything else I should have covered. In the meantime, the car stays in the garage.
Setting the bar in the space where it obviously goes, it becomes apparent that the bodywork will have to be "trimmed" to make room for the back legs. I use the tin snips to make the initial cuts, then a pair of pliers to bend back the remaining edges. Altogether, maybe 1 or two square inches of metal came off of each side. For this job, small angled tin snips are better than the big straight ones, though either will work.
At this point, my friend Bud from work dropped by to help out for a couple of hours.
We marked 2 holes on each side (couldn't get to the other two with a pencil!), then
made cardboard templates from the plates that go underneath to determine where the
other two holes go. There are 4 holes on each plate, Pat at Brainstorm told me that
only 3 were usable, but I went ahead and drilled the fourth one, thinking I might get
a shorter grade 8 bolt to go in that hole from underneath, and put the nut and washer
on top. The bar went in and out about three times, getting the hole placement done,
then Bud (the Mechanical Engineer who builds cars as a hobby...) center punched the
holes & drilled 3/16" pilot holes - I bought a 12" long 3/16 bit for pilot holes and
a 12" 3/8 bit for the final bolt holes; both 12" bits were extremely
helpful, short bits would have made the job much more challenging.
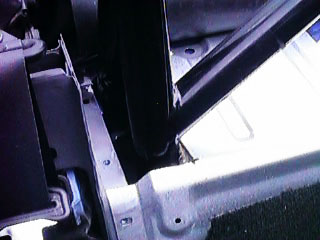
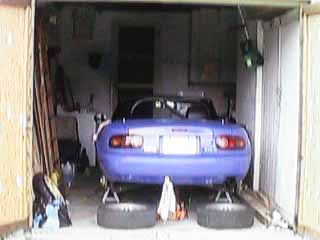 Access under the car was required to get the bottom plates
in place. I put the rear-end up on jack stands, pulled the wheels, then removed
the plastic fender well - making easy access to the place where the bottom plates
go, though it was more difficult to step in and out of the car over the closed
door after going up on jack stands.
Access under the car was required to get the bottom plates
in place. I put the rear-end up on jack stands, pulled the wheels, then removed
the plastic fender well - making easy access to the place where the bottom plates
go, though it was more difficult to step in and out of the car over the closed
door after going up on jack stands.
After drilling two pilot holes on each side, we put the bar back in to see how things were lining up. Things could have been better, one of the pilot holes was seriously off center somehow. We enlarged the other three holes, held the bar in-place with bolts through those holes, then enlarged the off-center hole using the holes in the 3/16" plate as a drill guide. At this point, Bud had to go home. I continued on up into the night, and after 5 hours of work, got the bar bolted in with 3 bolts torqued down on both sides. I decided the fourth hole should be filled with silicone, possibly to be used as a wire pass through someday. Those grade 8 nuts and bolts are really difficult to tighten! I torqued the nuts from underneath the car, using duct tape to hold an open-end 14mm wrench on the bolt-head inside the car. At first, I used the tape as you are probably imagining, sticking the wrench to the bolt-head, but later I discovered that my particular roll of tape was just the right size to jam into the opening between the bars, holding the wrench in place very effectively.
I touched up all the bare metal with rust-proofing primer, mostly dabbing it on with a brush after spraying it into the spray-can's cap. I also coated the plates with silicone aquarium sealer, which oozed out the sides when the bolts were tightened, making a airtight and watertight seal around the plate, hopefully preventing squeaks and rust.
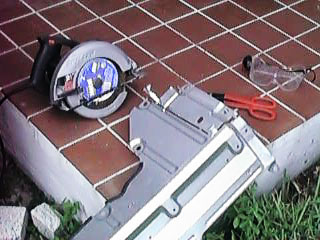 I started on the plate with 10" tin snips, with visions of cutting precise circles
where the bars go, folding the plate out of the way to install it, then folding it
back down, restoring the package tray support and keeping all 16 bolt attachments.
Ha! After I remembered I got a D in High School
metal-shop, mostly due to problems with tin snips, I decided that a skillsaw
equipped with a metal cutting blade would be a better way to go. They didn't let
me use metal-cutting skillsaws when I was 13, if they did, I might have gotten an
A instead of a D - it was really easy to cut nice rectangular sections out of the
plate. Needless to say, this job and the overhead drilling both call for saftey
goggles, there's lots of hot tiny metal bits flying everywhere, I got a couple
in my ears, ouch!
I started on the plate with 10" tin snips, with visions of cutting precise circles
where the bars go, folding the plate out of the way to install it, then folding it
back down, restoring the package tray support and keeping all 16 bolt attachments.
Ha! After I remembered I got a D in High School
metal-shop, mostly due to problems with tin snips, I decided that a skillsaw
equipped with a metal cutting blade would be a better way to go. They didn't let
me use metal-cutting skillsaws when I was 13, if they did, I might have gotten an
A instead of a D - it was really easy to cut nice rectangular sections out of the
plate. Needless to say, this job and the overhead drilling both call for saftey
goggles, there's lots of hot tiny metal bits flying everywhere, I got a couple
in my ears, ouch!
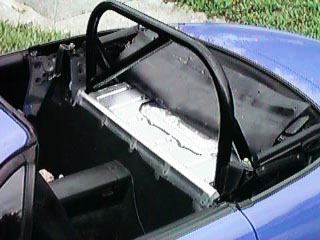
 The plate went back in like a charm, as you can see in the photo, I never did have to
completely remove the rear deck carpet, just fold it up out of the way. I cut/tore
chunks from the sound insulation pads and put them back into place. In my opinion,
those 3 pounds of fluff are well worth having in the car - they really cut down on
road noise. I also made a couple of tears in the carpet
so it would lay more or less flat. I think I'll leave the holes into the trunk space
open as access to a bit of extra storage, plus easy access to inspect the rollbar
installation. One day soon, I want to take the car to the local upholstry shop
and have them cut the carpet properly and stitch up the edges. Maybe they can
glue my soft top back together with something that doesn't instantly dissolve in the
Miami humidity, too. The seatbelt tower plastic covers went back without
modification - I did drive out to buy lunch with them off, they also serve as very
effective sound insulation.
The plate went back in like a charm, as you can see in the photo, I never did have to
completely remove the rear deck carpet, just fold it up out of the way. I cut/tore
chunks from the sound insulation pads and put them back into place. In my opinion,
those 3 pounds of fluff are well worth having in the car - they really cut down on
road noise. I also made a couple of tears in the carpet
so it would lay more or less flat. I think I'll leave the holes into the trunk space
open as access to a bit of extra storage, plus easy access to inspect the rollbar
installation. One day soon, I want to take the car to the local upholstry shop
and have them cut the carpet properly and stitch up the edges. Maybe they can
glue my soft top back together with something that doesn't instantly dissolve in the
Miami humidity, too. The seatbelt tower plastic covers went back without
modification - I did drive out to buy lunch with them off, they also serve as very
effective sound insulation.
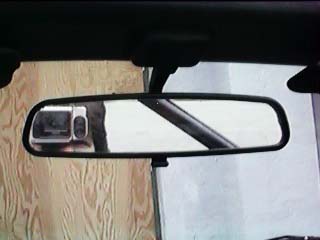 The crossbrace does appear in the mirror, but it does not totally obstruct rearward
vision. At my height, the main hoop does cut across just at the horizon line, so I
have to duck my head a bit to see any sky in the rear-view. Contrary to the claim
that the bar does not obstruct seat travel at all - if the seats are reclined even
a little, they run into the main hoop upright before getting all the way back. For
the passenger seat, this may be a plus, since I can jam it back into the bar where
it won't rattle, and finally be able to reach into the map pocket - it used to be
flush against the rear bulkhead. My seat ended up being pushed forward one notch
as well, not enough to cramp me, but still not where I used to have it.
The crossbrace does appear in the mirror, but it does not totally obstruct rearward
vision. At my height, the main hoop does cut across just at the horizon line, so I
have to duck my head a bit to see any sky in the rear-view. Contrary to the claim
that the bar does not obstruct seat travel at all - if the seats are reclined even
a little, they run into the main hoop upright before getting all the way back. For
the passenger seat, this may be a plus, since I can jam it back into the bar where
it won't rattle, and finally be able to reach into the map pocket - it used to be
flush against the rear bulkhead. My seat ended up being pushed forward one notch
as well, not enough to cramp me, but still not where I used to have it.
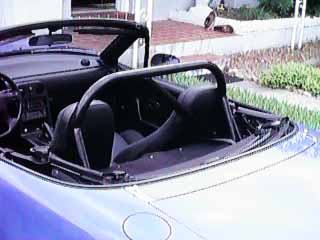
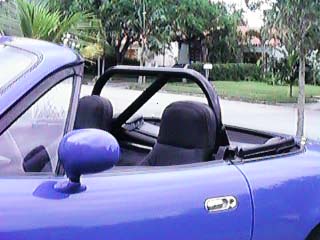
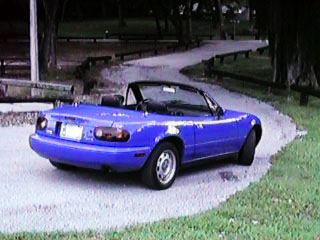
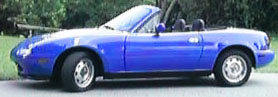
Of course, most importantly, I got it done in time to pack up and head for the
Bay Bottom Crawl which is what started this whole
project in the first place!