Menu options
AnaLink has many "screens" which you switch between using the menu commands. You may look over the menu options by pressing the Menu button in the lower left corner of the screen. Most menu options have shortcuts assigned, this is the easy way to navigate between screens - /C to collect, /G to graph, /T for text, etc.As of version 1.6, most menu options do something, but there are still a few that are placeholders for planned upgrades.
Collecting data
The View Capture /C screen is used to collect data. There are three checkboxes at the bottom of the screen: Connect, Store and Get Map.If Connect is not checked, the serial port is closed, and the screen stops - no data is stored.
If Connect is checked, the serial port is opened and graphs should draw if data is coming in from the Link computer. If graphs are not being drawn, you might be configured for the wrong computer, see configuring AnaLink. Other things to check are obviously the cable connections. AnaLink always operates at 24008N1.
If Store is not checked, no new data will be stored in the RunData
database.
If Store is checked and graphs are drawing, this data is being
appended to the end of the current RunData database.
It seems possible to leave Store on and go to playback to
review old data without losing any data from the current
recording... this function is not guaranteed, it's best to
leave the program at the collect screen while storing data.
While collecting run data, the top of the collect screen periodically updates to show the current time, day of week, date, month, and battery remaining, expressed as 1/100ths of a volt over the battery warning limit. Basically, if this last number reads 40 or more, you're in good shape batterywise. I use NiMH rechargables, once they start reading 20 or less, it's time to stop recording for a moment and swap in a new set of batteries. This performance may vary for Alkaline or other battery types.
Which text appears, and the order in which it appears in the View Instruments
screen is controlled by the Edit Text /E function. The first four items in the
View Text lineup appear top to bottom on the left side of the screen, and
the next four appear top to bottom on the right. It is recommended to keep
items with four digits (like RPM) on the left to avoid confusion.
Disclaimer: Use common sense! Just because the display is easily readable
while driving does not mean that you can ignore the road, traffic, etc. any more
than you can while using the Link keypad, a cellphone, or a Big Mac while driving.
If you're going to use this as an instrument display, mount it like an instrument
high on the dashboard, or even on the A-pillar. The FAA has
determined that John Denver (the reasonably famous singer) crashed his
experimental plane due to poor ergonomic design. He couldn't see the fuel gauge
without a mirror and couldn't easily switch to auxillary fuel tanks without a
pair of pliers. So, he didn't fill the primary tanks before taking off, didn't
check the fuel gauge in flight, ran out of gas, and couldn't switch to the
auxillary tank before he crashed. He's dead. Don't let this happen to you.
Tasteless dead singer joke from the same month: What did the tree say to
Sonny Bono? I got you, babe. Use common sense.
The meaning of the text columns is as follows:
The graphs themselves have a dark square on the median value, with a wide
grey bar covering the interquartile range (50% of the data falls in this
range), and thin lines extending to max/min observed values. If no graph
appears, no data was recorded in that particular zone.
Expect changes and enhancements here.
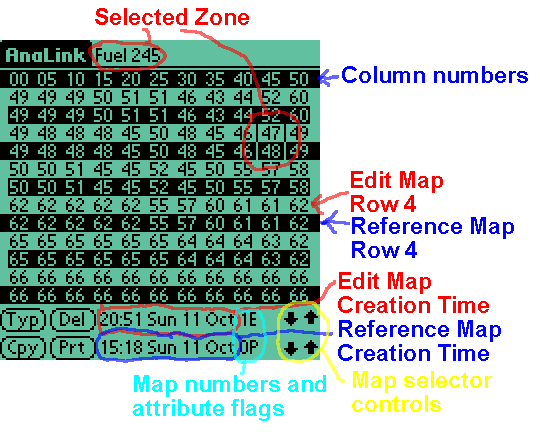
Tapping on an edit map entry causes it to be selected, vertical bars
appear on either side of the currently selected entry, in both edit
and reference maps. The currently selected entry is also identified
at the top of the screen (e.g. Fuel 235). You may change the value
of the currently selected entry in the edit map by tapping the space
immediately above or below the number to raise or lower the value.
The reference map values will not change.
At the bottom of the screen are two times with a number/letter code
following and up/down arrows to their right. The top line identifies
the edit map, the bottom line the reference map. The time is the time
the map was captured or created as a copy. The number is the map
record number starting at 0. Newly captured or copied maps are
assigned the next larger number. When maps are deleted, all maps
after the deleted one have their number decremented. Basically, don't
depend on the number, it's gonna change, but the time won't.
Two letters P and E may appear behind the number. P indicates the map
is "protected" and may not be edited. The Prt button toggles the P
on the currently selected reference map. Maps are set with P on
when captured and with P off when copied, but this may be easily
changed with the Prt button. E indicates that the map was edited at
some time after it was created. Once a map gets an E stamp, it
cannot be removed, though a new copy may be made which will have
identical values with a new time stamp and no E.
The Del button deletes the currently selected edit map. The Cpy
button creates a copy of the currently selected reference map.
Typ changes the type of map being viewed, low RPM ranges Fuel,
high RPM ranges Fuel, low RPM ranges Advance and high RPM ranges
Advance.
Those arrows on the right allow selection of the current edit and
reference maps. Note that you cannot select the same map for both
edit and reference, and that P maps will not show up in the Edit line.
If there are no available maps to edit, a copy of the current reference
map will automatically be created.
In all likelyhood, all you need to do is capture one map, then go to
Edit Maps and edit the automatically generated copy and not mess with
any buttons or arrows other than Typ, and Del when you're done.
The sample maps AnaLink_MapData.PDB
will allow you to play with the Edit Maps screen if you haven't
purchased the software.
By the way, the (i) button in the upper right brings up an info screen to
remind you what the letters stand for.
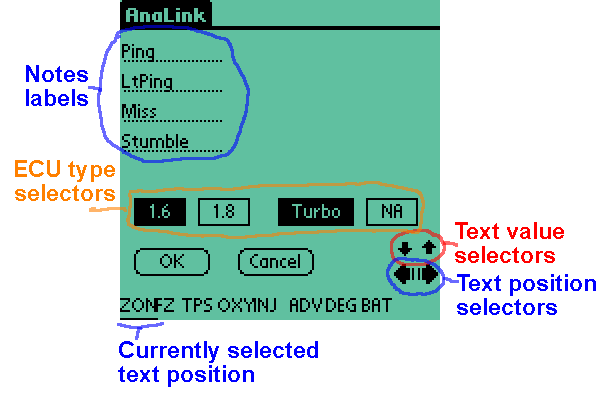
Edit Text /E allows configuration of the text line output, what the
notes display as, and what type of data AnaLink
looks for when connecting to the Link computer.
At the bottom of the Edit Text screen is a "header line" showing how
text is currently configured. The four arrows at the lower right
(sorry lefties, Pilots are a real pain that way, aren't
they?) allow configuring the text line. Left and right moves the
"selector" which shows up as an underline under the current choice.
Up and down changes the current selection, with one of the possible
selections being end of list. If you see most of all of your text line
dissappear, don't panic, you've selected end of list, just select again
and the rest of the line will reappear. It is possible to make a text line
too long to see on the screen, you can always insert an end of list choice
anywhere to cut the line off at that point. Also, it is a good idea to leave
a little space on the right, since notes always appear just to the right of
the text line.
Turbo vs. NA changes how the Zone numbers are computed. Turbo assumes
40 MAP units per row, while NA uses 20.
The sample data AnaLink_RunData.PDB
is recorded on my 1.6, so if you play it back in 1.8 mode you'll get
some slightly wierd results as the following values are substituted:
WG%=TPS, TEMP=DEG, KNK=BAT.
The values down the right side are fairly self explanatory, displacement is
in cc, Injector flow rate is cc/min, tire size is revolutions per mile, and
weight is in pounds.
Once you delete a record off the Palm Pilot, it is gone. There is
currently no fancy PC conduit for AnaLink data.
alc.exe
is a DOS command line program that translates AnaLink .PDB
files to ASCII format .TXT files so you can import the data into
spreadsheets, E-mail it to friends who have no PalmPilot, or whatever.
Since this is a DOS program, it works with the short filenames.
AnaLink_Translator.exe
is the Win95 version - it supports long filenames. Both programs are
relatively self-explanatory (if you aren't familiar with DOS, use the
Win95 program), just open any AnaLink .PDB file, Map or Run data,
and then save the output in your desired .TXT file.
Map Capture
To collect the current "map", start with the key off. Set up
the Pilot and AnaLink and check Get Map. When you turn the key
on, the map will be captured and Get Map will uncheck itself when
done. A bar graph shows progress of the map capture. Too many
errors, or prematurely unchecking Get Map will cause the map
capture to be aborted. Always check your maps for reasonability,
I have never had a problem with corrupt maps coming in, but if
it does happen, it should be fairly obvious.
Instrument Panel
Starting in version 1.3, the View Instruments /I screen functions just
like the View Capture /C screen, except instead of drawing graphs, large numbers
display the most recent data received. This can be used as a digital
instrument panel while recording, or simply connected. As with
View Capture /C, unchecking Connect will freeze the display, and
halt any recording.Notes
While recording data, the four "Application Buttons"
They look like a clock/calendar, telephone, checklist and memopad
are also monitored by AnaLink. Pressing a button causes the corresponding
note to appear in the playback graph and text. You won't see anything
during recording.
Playing back data
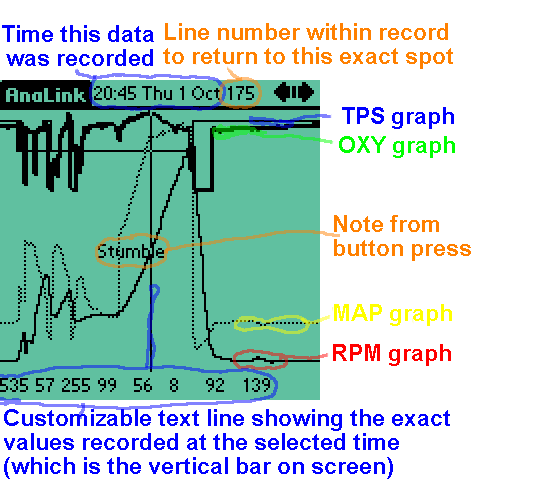
There are two playback screens: View Graphs /G and View Text /T. View Graphs shows the same graphs that were on the View Capture
screen, with some extra info. The line at the top of the screen
now shows the time when the data was recorded, and the last number
is no longer battery voltage, but "line number" of the first data
on this graph which makes it possible to pinpoint where you are in
the record. Each screen shows 160 lines of data. The two arrows
at the top allow "fine scrolling" through the data, and the "up/down"
buttons on the bottom of the Pilot make bigger jumps.
Tapping on the graph area will draw a vertical bar at the point
tapped, and draw a line of text at the bottom of the screen giving
the numbers for the point tapped. This text line is in the same
format as the View Text lines.
Dotted vertical bars appear on the graphs between recording sessions.
Edit Graphs /R allows configuration of the
graphs.
View Text shows the same data that the Link computer outputs, or
you can configure it with Edit Text /E to
show different representations of the same data. As with View Graphs,
the arrows at the top do small steps through the data, while the
"Hard Buttons" on the bottom of the Pilot do bigger steps. The line
at the top still shows when the data was recorded, and the caption
line (telling what is in each column) appears at the top of each
recording session. Notes always appear to the
right of the text line that was received when the button was pushed,
if there's space.
RPM MAP TPS OXY INJ ADV DEG BAT WG% KNK TEMP are all as reported
by the Link ECU. The following "derrived" values are added:
Analyzing data
As of version 1.1, analysis is a bit rough. You choose a zone,
press draw and graphs of O2 readings in the selected zone appear, slowly.
The center graph is for a "focused" subsection (FZ=55) of the zone itself.
The graphs immediately left and right of it move the focus up and down the
MAP range, and the groups left and right of the central group do the same
thing up and down the RPM ranges.
Viewing and Editing Maps
The Edit Maps /M function allows review and editing of maps collected
from the Link computer at key on. This is only concerned with Fuel
and Advance maps, the 32 setting values (shown above) will be dealt
with elsewhere.
 The Edit Maps screen may be a little confusing at first. You are
looking at two maps at one time. The black on white (grey on teal?)
characters are the edit map, white on black are the reference map and
a header line at top. Each edit map entry corresponds to the reference
map entry immediately below it.
Configuring collection, playback and analysis
The Edit menu options are concerned with configuration.
Edit Graphs /R allows selection of which graphs are plotted, and how they
are drawn. This affects both collection and playback graphs.
The Edit Graphs /R screen also has a rather important "defaults" button,
this button not only resets all graphs to their default settings, but
also all other program parameters (ECU type,
constants, text output, notes, etc.)
This may sound a bit far-reaching, but it can be useful when upgrading to a
new version that has lots of new variables that need setting, just remember to
tap with caution.
 Under Edit Text, the four words on the upper left are the Notes
labels, tap 'em and change 'em to get different labels. This will
change the labels for all data played back since the labels are
stored in the database as 1,2,3 and 4 to save space. You have to
press OK for these changes to take effect. Pressing OK or Cancel
will take you out of the Edit Text screen into the View Text screen.
Under Edit Text, the four words on the upper left are the Notes
labels, tap 'em and change 'em to get different labels. This will
change the labels for all data played back since the labels are
stored in the database as 1,2,3 and 4 to save space. You have to
press OK for these changes to take effect. Pressing OK or Cancel
will take you out of the Edit Text screen into the View Text screen.Link ECU type 1.6/1.8 Turbo/NA
You can select multiple ECU types,
1.6 decodes lines that contain:
RPM MAP TPS OXY INJ ADV DEG BAT
1.8 decodes lines that contain:
RPM MAP WG% OXY INJ% TEMP KNK ADV
1.6/1.8 decodes lines that contain:
RPM MAP WG% OXY INJ% ADV TEMP KNK
Version 1.7 and later of AnaLink rename the above ECU types as T-1, T-2 and T-3, respectively,
and it adds a T-4, which decodes lines that contain:
e RPM d MAP L OXY *W/E t INJ *I/T s KNK ADV
only the numeric portions are stored and graphed, all the special characters are ignored.
AnaLink actually ignores the text lines, only looking at lines with numbers
in them, and comparing those numbers to expected ranges for the values.
It works out that if you have 1.8 selected and you're hooked up to a 1.6
computer, View Capture won't draw any graphs, or won't draw them very
consistantly, when you Connect, likewise hooking up to a 1.8 computer
with 1.6 selected will draw no graphs (and store no data).
It seems that the 1.6/1.8 data format only went to a few customers around April
of '99, and that the newest 1.6/1.8 ECUs have returned to the 1.8 data format.
Main thing is to match the lines above with what actually comes from your ECU.
Edit Constants
This screen contains a variety of vehicle constants, used to compute
things like speed, MPG, etc. The numbers down the left side are gear
ratios, starting with the differential and then through the gears in
the transmission. No decimal is needed, put in the actual ratio number
times 1000. If you don't have a 6th gear, do whatever you like with this
slot.
Deleting Run Data
Of course, if you delete AnaLink with the Pilot Memory manager program,
all the Run data and Map data goes out with it, and you can reinstall
the .prc file (and reenter your owner code and preferences) and you'll
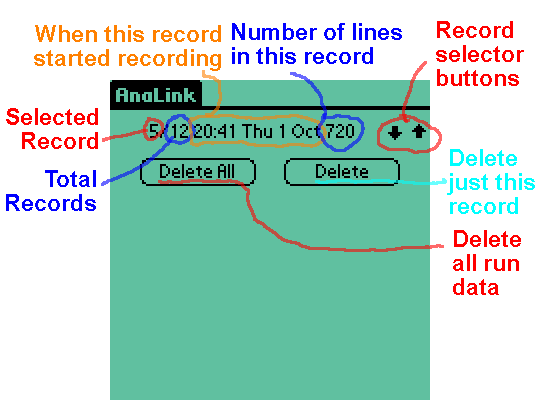
have a "clean" AnaLink with no data. There's also a better way. Under Edit Records /D, you can delete Run Data records one at a time,
or wholesale. The line of text identifies the currently selected
Run Data record by the time it was recorded. Each recording session
gets its own record and each record runs up to 720 lines (a bit over
3 minutes), if a recording session runs over 720 lines, a new record
is automatically opened and the session continues seamlessly. And,
yes, record numbers are supposed to start with 0 and end 1 less than
the total number.
Thanks, Beau.
Saving Data
There is, however, automatic backing up of both the Run Data and Map
Data. Every time you hotsync, the current AnaLink data files are
backed up in your \pilot\yourname\Backup directory. From there, you
can rename the files and/or move them to other directories. These
files may be re-installed on the pilot later to review old data,
shared across the Internet like the sample files, or whatever.
Planned upgrades
I wrote AnaLink for my own use, but I recognize that there are other
people who will find it useful too. My current plans include:
I'm also open for suggestions.Version History
This manual is obviously a work in progress, if you have any questions or
suggestions, please send them to: topcat@mangocats.com.
This website and all its contents are Copyright © 1998-2000 by Mike Inman, all rights reserved.